NIRS-EEG protocol E.Noordanus
How to use this protocol
This protocol describes the procedures, equipment and software used in the NIRS-EEG lab. The following reading is recommended.
- All readers: read chapter 2.
- For readers who use existing, well defined measurement procedures and do not need to make any changes to the software or hardware setup: read chapters 3 and 4. In addition, for readers who perform EEG measurements: browse through chapter 9 and read chapter 10 thoroughly; for NIRS users: browse through chapter 11 and read chapter 12 thoroughly.
- For readers who want to change an existing Matlab script and/or RPvdsEx circuit or create a new experiment: read chapters 3, 4, 5, 7, and 8. In case of big changes, it is advisable to read chapter 6 in addition and contact a senior researcher.
- For readers who want to look in detail at EEG measurements: read chapters 9 and 10.
- For readers who want to look in detail at NIRS measurements: read chapters 11 and 12.
- For information concerning the TDT equipment and all connections to the TDT equipment: read chapter 6.
First user
Lab procedures
- Covid-19 prevention lab rules: COVID-19
- Safety first!! Please, keep your own safety and that of your subjects always in mind. Number - who to call in case of emergency:
- When handling equipment always take care! In case you are new to the lab contact a senior researcher for help and also when you are unsure on how to handle equipment!
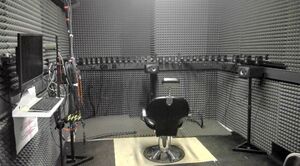
- No eating and drinking allowed in the lab. This includes drinking of water. Exception: during an EEG measurement drinking from water bottles that can be closed is allowed for subject and experimenter in the experimental room (see Figure 3), due to the long procedure of fitting the cap and the importance of keeping both subject and experimenter awake. Take care not to spill any water!
- Being in the lab before 7 and after 18 o’clock and on weekends is not preferred. The entrance to the lab (the big doors after the elevator) will be locked from 18 o’clock to 7 o’clock the next day! Make sure you always leave the lab before 18 o’clock! In case of entering before 7 o’clock and staying after 18 o’clock a Radboud card with access rights (with pin code - arrange via Judith) is necessary. When you are planning to be in the lab outside these times, especially for weekends, authorization of a senior researcher is required.
- Report to your senior researcher if supplies are missing and if anything is broken or doesn’t function. In the latter case also report this in the Issue tracking system at gitlab.science.ru.nl.
- Depending on the current Covid-19 regulations of the Radboud university, Donders center and the government, the following rules will apply. The distance between the experimenter and the subject will be at least 1.5 meter, except during the placement of the EEG cap, when the experimenter will wear a disposable mouth-mask, a clean lab coat, and gloves. The subject can also wear a mouth-mask and gloves (available in the lab), but that is not required. All equipment that needs to be touched by the subject will be cleaned and disinfected beforehand and between measurements. The airco must be on and before and after the measurements the doors will be kept open until you leave.
- Always keep record of your experiments in your lab journal.
Handling subjects
- Each experiment must be recorded in your lab journal (blue book),
- Each subject needs to sign the Consent form (located in the cabinet on the left side of the lab, to the left just out of the view shown in Figure 2) before start of the experiment.
- The questionnaire (also in above mentioned cabinet), must be completed for each subject and afterwards pasted into your lab journal.
- Add ?: Ear checking/cleaning procedure?
- Add: always start with audiogram measurement.
- Add: Cleaning procedure for this lab (it is now and then necessary to clean the floor etc…) + where to empty the bins.
Cleaning procedures
Washing of towels and lab coats is arranged in the Covid-19 procedures.
Procedure for data storage
Important: follow the RDM (Research Data Management) procedure of the Donders, see: https://www.ru.nl/donders/research/research-data-management/ Put your data (and only your data, no scripts) in directory: C:\DATA\<folder with your initials> or in the my documents directory of the PC you use for the measurement. Backup your data in the Donders repository (data.donders.ru.nl) or to one of the department network drives. You can use the network location: mbaudit3-srv.science.ru.nl for EEG data and mbaudit4-srv.science.ru.nl for fNIRS data. Of these network drives a backup is made regularly. On the lab PC: click the Start button, click “Computer” => Map network drive. Choose a drive letter and fill in for the Folder: “\\mbaudit6-srv.science.ru.nl\mbaudit6”. Check the options “Reconnect at logon” and “Connect using different credentials”. Use your science login to connect.
- These network drives are intended to back up your raw data. You may copy data to your own PC (or external drive), but you should never modify or delete the files on the network drives! For more info, see Research Data Management.
- Also save a backup of all scripts and other files that are important to repeat the experiment and your analysis on the network drive.
When you don’t need the data any more on the measurement PC and you entered the data in the Donders repository, you can remove the data from the measurement PC.
Lab reservation
Reserve lab time with qreserve: [1](https://www.qreserve.com). First ask for a new account or – in case of students – for the login of your supervisor. Click “Department of Biophysics” on the Dashboard page and choose Resources - NIRS-EEG Lab.
Location
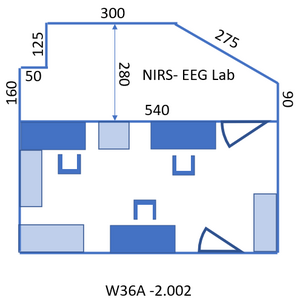
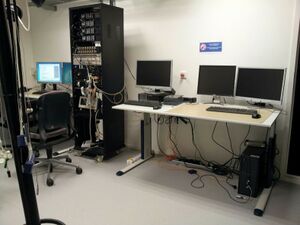
Access to the lab: take the last elevator at the opposite end of the building from wing 8 to floor -2 and follow the signs “Biophysics labs” to the room: A1 -2.002, the NIRS- EEG lab. Entry code of the room: ask your supervisor. To walk back to the elevator: follow the signs “Huygensgebouw”. Toilet: exit the lab to the right, turn left after the graffiti, the two doors to the right after the stairs and before the big door. Figure 1 gives the layout of the lab. The lab consists of two rooms, see Figure 2 and Figure 3. The first, where you enter the lab, will be referred to in this protocol as “control room” since the PC’s are located over there. The second will be called “measurement room”.
Setup of the main PC

The PC to the left in the control room is used to generate stimuli and control the experimental flow over the TDT (Trucker-Davis Technologies, USA, see next chapter).
- Press the on button of the PC (see Figure 4).
- Ask your supervisor to create an account on the PC you use or provide you with the login information of an existing account. In the latter case, you don’t have to perform the steps below, but read them so you know where to find the scripts and the information you need. Remark: references in this protocol to “your initials” or “your first name” indicate the name of this user account.
- Experimental and data analysis scripts can be found at: https://gitlab.science.ru.nl (more specifically: https://gitlab.science.ru.nl/marcw/biofysica/tree/master). Ask Marc van Wanrooij to give you access to biofysica and biophysics_labs. Here you can:
- Report / view Issues in https://gitlab.science.ru.nl/marcw/sphere_lab/issues. Label your issue with [EEG/NIRS]
- Download the most recent version of all software and put that in C:\gitlab\[Folder with your first name]\biofysica.
- To easily add all files in the biofysica directory to your Matlab path, add a file “startup.m” in the directory C:\users\<your user name>\My Documents\MATLAB with the line:
addpath(genpath('C:\gitlab\<Folder with your first name>\biofysica')); - Never change the files in C:\gitlab\<Folder with your first name>\biofysica, so you can easily update all files from gitlab. Updating ‘the git way’ instead of plain downloading requires a different approach, using git tools. This may not be needed by all users, but if you change programs or scripts frequently, using git tools is very convenient.
- Place your own scripts (Matlab and rcx files, see chapter: “Create stimuli and interact with the buttonbox”) in (a subdirectory of) C:\users\<your user name>\My Documents\MATLAB. Be sure to always use new names for your own scripts and functions to avoid mix-up with the files in the biofysica directory.
- See “$2.1 Lab procedures” above for data storage and backup procedures.
3. Overview of the Measurement Setup
Tucker-Davis Technology
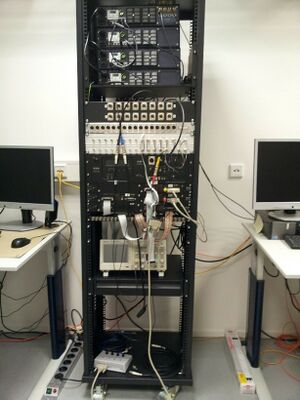
The TDT equipment (see Figure 5) is used to generate stimuli and present them on the speakers (or a headphone) in the measurement room. The RZ6 is central: it generates the stimuli and presents them to the PM2R multiplexers (labeled: “device 1”, “device 2”, and “device 3”), which send the stimuli to the correct speaker(s). Furthermore, the RZ6 registers the output of the button box (which button is pressed by the subject) and controls the input (which lights turn on) to the button box. It can do (limited) data acquisition and processing. The RZ6 also sends timing signals (“triggers”) to the EEG measurement equipment (the Refa; TMSi) in the measurement room. That is the only connection between the TDT and the EEG equipment.
Table 1 gives an overview of the coding to activate each of the 32 speakers. Negative angles represent the left hemi field (left of the center). Device and channel counting start with 0.
| Speaker position (degree) | Device | Channel | Speaker position (degree) | Device | Channel |
|---|---|---|---|---|---|
| 0 | 0 | 0 | |||
| -5 | 2 | 1 | 5 | 0 | 1 |
| -10 | 2 | 2 | 10 | 0 | 2 |
| -15 | 2 | 3 | 15 | 0 | 3 |
| -20 | 2 | 4 | 20 | 0 | 4 |
| -25 | 2 | 5 | 25 | 0 | 5 |
| -30 | 2 | 6 | 30 | 0 | 6 |
| -35 | 2 | 7 | 35 | 0 | 7 |
| -40 | 2 | 8 | 40 | 0 | 8 |
| -45 | 2 | 9 | 45 | 0 | 9 |
| -50 | 2 | 10 | 50 | 0 | 10 |
| -55 | 2 | 11 | 55 | 0 | 11 |
| -60 | 2 | 12 | 60 | 0 | 12 |
| -70 | 2 | 13 | 70 | 0 | 13 |
| -80 | 2 | 14 | 80 | 0 | 14 |
| -90 | 2 | 15 | 90 | 0 | 15 |
Table1: device (multiplexer number) and channel coding for each speaker.
EEG system (Refa)
The EEG system (Refa) has 72 channels. It is connected via an orange bi-directional optical fiber to the PC to the right of the TDT in the control room. The EEG data is measured and saved continuously during the experiment (so not per trial). In a separate channel (channel 73, named Digi) the trigger signals from the RZ6 are saved. Only the button response and the timing of the button press need to be saved via the RZ6 and the Matlab script (of course you are free to program a script that saves all kind of other information, for example regarding the exact timing of the stimuli).
4. Present stimuli
RZ6

- Check if the connection of the cables is correct for your experiment.
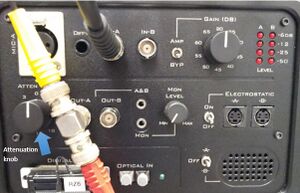
- Attention: always leave the attenuation knob (to the left in Figure 6) at 0.
- If the electrostatic speaker driver is not being used, make sure that the ON/OFF switch (to the right in Figure 6) is in the OFF position to reduce noise on the RZ6.
- To start the TDT: switch the four power buttons indicated in Figure 7.
- Do a test run with your Matlab script.
- When you want to hear the A or the B sound output directly from the small speaker integrated in the RZ6 (lower right corner in Figure 6), you can put the switch next to the speaker either to “A” or “B”. When you hear nothing turn the volume up with the knob (in the middle row) labeled “Mon level”.
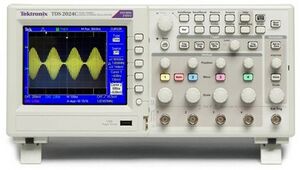
- Connect the analog output signal (for example output OUT-A) to one of the inputs of the oscilloscope – see Figure 8 – to check the output signal.
- If everything is prepared do a test run with your subject before starting the real measurement.
- For performing EEG measurements see chapter 10. For NIRS measurements: see chapter 12.
Oscilloscope
The large round button in the right lower corner changes the x-axis: the time per division (shown in white in the center below the x-axis). There are four input channels, marked 1 to 4 with different colors. You can change general channel settings by pressing the colored button of the channel. Each bigger knob below the number changes the y-axis of the channel: the voltage per division (shown in the color of the channel below the x-axis). Each smaller knob above changes the offset of the y-axis of that channel. The “Probe ..X Voltage”, listed in the display to the right, should be at 1X voltage. Manual: http://docs-europe.electrocomponents.com/webdocs/07dd/0900766b807ddf1d.pdf.
NIRS equipment
%todo
